
I suggest that you read Ed's seminar on how to build a coraplast fairing either before or after you read mine. Ed goes into greater detail than I will. Mainly, I am showing my modifications adapting Ed's ideas to the Linear Sonic.
The frame for the fairing is constructed of one inch PVC pipe. This is readily available at hardware and building supply stores such as Home Depot, and Lowe's. It is inexpensive and very strong. Ed suggests that you glue most of the support pieces together, except for the joints for the main connectors to the frame. However, I used small sheet metal screws as set screws in the joints. I can take the entire frame apart at any time. This size PVC pipe Tees when cut correctly will fit the tubing on most bicycles. Here was my main problem, the Linear isn't made from tubing.
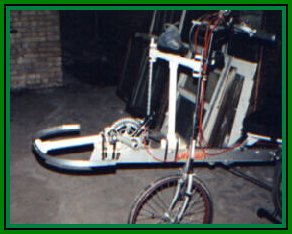
The mainframe piece of the Linear Sonic is an aluminum box beam approximately the size of a 2 by 4. Also, the bottom bracket is over the box beam and I wasn't able to place a Tee on it to support the forward boom. The frame is then inclined if I attached the joint directly to the frame it would've been pointing upwards. I measured the inclined and determined it went up 2 cm for every eight inches. (Excuse me for mixing cm and inches but it's what worked for me) I cut the piece of 2 by 4, 8 inches long and in 13 mm (half-inch) deep on one end and 33 mm (1 9/32 inches, metric was easier to measure) deep on the other.
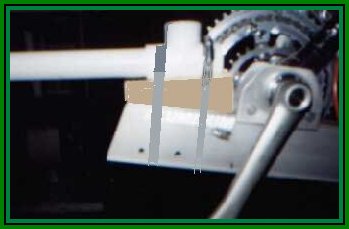
I affixed the piece of 2 by 4 to the frame in front of the bottom bracket. I drilled two holes through the wood and the top of the frame. Two long metal screws connected the two together quite easily. I then placed the Tee joint on top of the wood. I used to methods to fasten the Tee. First I drilled a pilot hole through it, the wood, and the top of the frame. In used to screw to fasten all three together. Then I placed to hose clamps around the Tee, the wood, and the frame. This made for a fairly stable support.
However, I found this arrangement to be very slow for attaching the fairing nosecone. After a little thought I substituted a one inch PVC compression coupling for the Tee. I no longer had to lineup the holes to pass the locking wire through. All I had to do now was screw on the coupling and I was done. It also made for very easy removal just reach forward spinoff the collar and it was off.
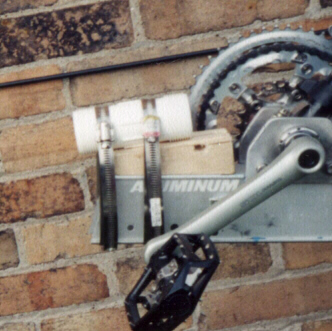
The support for the main upright is placed a few inches in front of the steering tube. I cut another piece of 2 by 4, eight inches long with no depth at the front and 2 cm deep in the back. I then fastened this piece of wood to frame like the first one I put the Tee on top of the wood and loosely tightened two hose clamps around. I then placed the piece of PVC pipe in the top opening. I used a small level to make sure the pipe was straight up and down. I then drilled through the top opening to make a pilot hole through all three layers. Fasten them altogether and tightened the hose clamps.
Sorry the picture isn't to clear
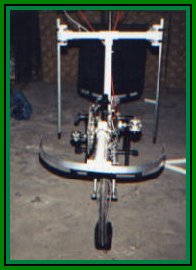
You can see the hose clamps better in the above picture. This picture shows the PVC pipe supports for the front nosecone. I then took a piece of 1 in. by 1/4 in. Aluminum stock approximately 30 inches long and bent it into a 20 inch across semi circle. It is attached to the front Tee by 4 pop rivets. The main piece of the nosecone is attached to it.
![]()
![]()